Showing posts with label WW2. Show all posts

Saturday, February 2, 2013

US Airborne, Roads and some Tanks

I haven't posted in a while, how unusual I can hear you all say, well I have been busy.  I've managed to get quite a lot done in between games of Bolt Action over the last few weeks.

US Airborne

Painting the Fallschirmjagers has slowed right down as I'm yet to figure out how to paint a good looking splinter camo so like all good wargamers I switched to another (easier) project.

A couple squads of US Airborne laying around in the sun.
So far I've managed to finish:
  • HQ Squad including (Lieutenant, Medic, Radioman and Forward Observer).
  • 2 Squads of 10 men including NCO, 2 Bar and a mix of SMG, Rifles and Carbines.
  • 30 Cal LMG team.
  • 50 Cal HMG team.
  • Sniper team (upright and prone).
  • Light Mortar team.
There's probably another 30 miniatures in various stages of completion which I'll probably get done this weekend (maybe *crosses fingers*).

Terrain

Roads, I cut these out of 5mm MDF and glued sand onto them and then painted them with a latex paint.  Nice and easy, maybe and hours work all up.


I've got some "wobbly" river pieces cut out just waiting for some attention but I'm just trying to find and easy way of building the banks up a little so they don't look so flat.

Tanks and Vehicles

Just a teaser shot of the tanks I've finished: Sherman M4 Sherman, M4 Sherman 76mm, Stug III Ausf.B, Tiger I and a Warlord Sd.Kfz 250/1 Neu Halftrack.
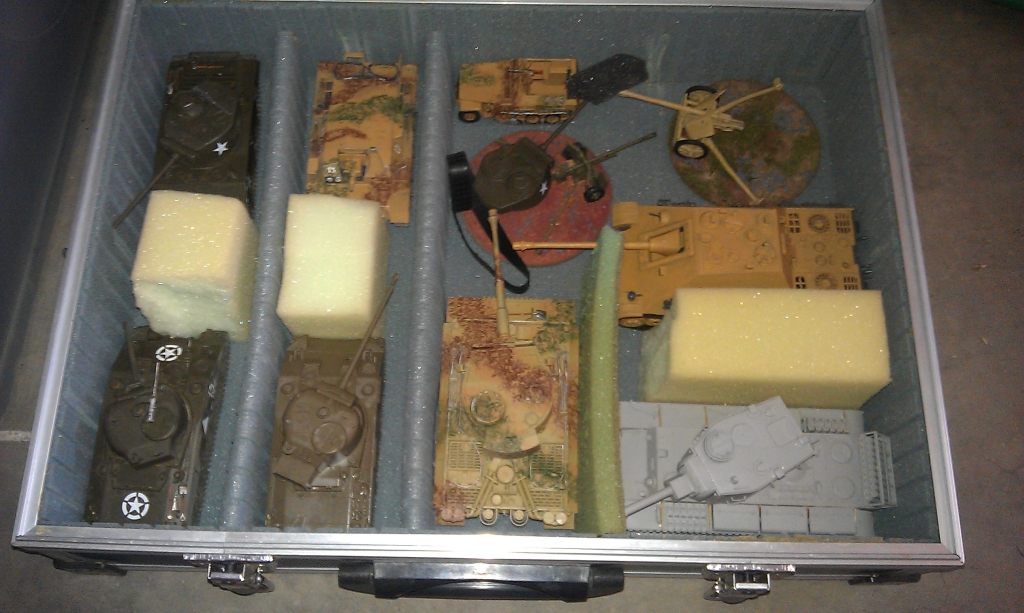


I'll get some more photos of these up in the next couple days, but I must warn you now that the decals may not be accurate for a vehicle operating in North West Europe and the camouflage has been completely made up.

Anyway I'm off to go play another game of Bolt Action.

Tuesday, January 15, 2013

A Crazy Thing Happened This Morning

A crazy thing happened this morning: I sat down to put together one of the model kits I've had laying around for a few years now and I just kept building.  Sure there were interruptions and I even had to shuttle my wife around for a few errands bet every time I came back to the kitchen I picked the glue back up and continued to stick stuff to other pieces of stuff.

This almost never happens but I'm glad it did. 

L to R: M4A3, M4 and the Pz. Kpfw K-V2

Both the M4 and M4A3 kits came with options for alternative turrets but the M4A3 came with enough parts to actually build both.   I haven't looked into what the differences between the two are (if any) but it never hurts to have options even if they are purely cosmetic.

I don't have any Bolt Action stats for the KV-2 but it shouldn't be too hard to translate something from Disposable Heroes or Victory Decision.

I've put quite a bit of paint on the Warlord minis and have even built some terrain pieces but haven't managed to take any photos of them, I'll try to get that corrected some time tomorrow.

Up next a Jagdpanther and a pair of Fw190's.

Friday, November 23, 2012

Terrain: 28mm Ruined Church - Part 1

I've started putting together the ruined church from Dave Graffam Models.  Initially I started building these out of MDF for extra strength but the extra time it took to cut and glue the MDF just sucked all the fun out of building the models.  Foam board is much simpler to put together and coupled with some fast drying white glue the process of putting this together has been very enjoyable.

Foam card makes for a faster build, all this in one evening.

The outer wall goes up first.

The tower starts to take shape.


With a little luck I'll get this finished before my next game tomorrow night, I just can't wait to see it on the table.

Monday, November 5, 2012

Disposable Heroes

I'm back, no really it's true.  I've even played a game that's not a board game or a card game.  I can't believe that it's been so long since I've posted or played a real life wargame.  Well that's all going to change.

Saturday night I introduced Tyler to his first miniatures wargame, Disposable Heroes.  What had started as a complex scenario based affair ended up being scaled back to an easier to learn just-shoot-everything game.  To keep things moving (you could also read that as I had forgotten most of the rules) I left out the cool toys like armour and guns.  Besides it kept the game down to the simple but important elements of movement, firing and morale.


An overview of the battlefield.

The man cave has become more of a storage area lately so I found it easier to setup in the garage.  I have to admit that the table came up very nice indeed.

A nice shot from the British side of the table. 
 
Germans start on the left and British on the Right.
 
The British ready to go.

Tyler picked up the core of the game pretty quickly and the game started to flow nice and quickly.  British and Germans were dying all over the table... well mainly around this guy:

Why can't the British LMG's work so well?

The bugger kept passing his morale tests and eventually wiped out an entire squad of British.

We were on turn three when we realised that we had been talking for most of the game and it was now 11:30pm.  We called it a draw and finished up for the night :)

I'm really keen to get the miniatures on the table again and I might even make an effort this week to finally finish off building some wooden fences (started them two years ago I think).

Anyway I'm back and reinvigorated so expect to see some more 28mm WW2 action here soon.

Saturday, October 16, 2010

Painting the Incursion Miniatures – Day 2

Well technically it’s day three but I didn’t do much yesterday so it doesn’t count.  I’ve finished painting Hans the Hunter.  But he is the coolest looking.
IncursonPaintingDay2_01
I’ve also finished the zombies for now.  There’s plenty of little details I haven’t gotten to yet but I’ve already spent so much time on these guys and there’s other miniatures that need finishing before Saturday night.
IncursonPaintingDay2_02
They look good enough for use on the table but some close ups here show that things like the buttons, pouches, belts and so on all need to be done.
IncursonPaintingDay2_03 IncursonPaintingDay2_04
They will get finished off and given a coat of matt varnish, this weekend hopefully, but right now I need sleep and then tomorrow I’m finishing these guys.
IncursonPaintingDay2_05
And I still need to re-read the rules and get the current FAQ.  Sigh, maybe I don’t need sleep after all.

Wednesday, October 13, 2010

Painting the Incursion Miniatures – Day 1

I managed to get all the Incursion miniatures based last night and today I took an RDO and started painting.

IncursonPaintingDay1_01 IncursonPaintingDay1_02

Sorry there’s no close up photos as the lighting in the family room is pretty bad this time of the night and I’m too tired to set up elsewhere.  I spent most of the time on the zombies but I have managed to also get base coats on the Apes and Von-X’s.  The werewolf is the only one without any paint, but I still have two nights before they hit the table.  It’s been a while since I’ve done any serious painting and I’m pretty happy with the amount of paint I was able to slap down today: 37 minis has to be a new record for me.  I’ll be even more impressed if I can get them done before Saturday but so far I think I’m on track.

Monday, October 11, 2010

Incursion is Here!

I got a phone call after lunch telling me that my parcel from the US had arrived.  Incursion was here!  Waiting until 5 (not a heck of a lot of work got done) was arduous.  Eventually I got home and found these waiting for me.

Incursion01

Here’s the contents of the German starter (left) and Allied starter (right).  Not the best photos I’m sorry but I’ll get better ones up when I put these together (starting tonight).

Incursion02 Incursion03

As for the game itself the box is a lot heavier than I imagined it to be.  Opening the box explains why, the top inch or so of the box is all gameboard and card counters. 

Incursion04 Incursion05

I won’t go into the details of the box contents yet but I will post something soon, right now I need to start painting.

Thursday, October 7, 2010

Secrets of the Angry Wife

I’m in so much trouble.  I knew I would be before I did it… but didn’t stop me though.  Dogui over at oMAD made me an offer I just couldn’t refuse and soon I’ll have both the 1949 - Secrets of the Third Reich rulebooks making their way to my gaming table.

wwd_str_ess_rbk_101_000_01_large wwd_str_ess_rbk_111_000_01_large

I’m excited but my wife won’t be… when she finds out.  I may have to move into the man cave for a while.  Hmm, maybe I should get the books delivered there instead.

Thanks Dogui - for the books that is, I can get into trouble all by myself.

WW2… with zombies AND werewolves AND mechs… really does it get any better?

Wednesday, October 6, 2010

Incursion Zombies

I came home to find some zombies in the meter box.  Usually I just hate that, but these were the ones I ordered from Maelstrom.

SoTRzombies01The amount of duplicate miniatures in the package isn’t too bad considering the amount that you get.  A bit of creative painting and the “Seperate Head System” that Westwind use should make it easy to create some unique looking zombies.

SoTRzombies02 SoTRzombies03

The quality of the scuplts are impressive with some very classic “zombie” like poses.  The casting process has left a fair bit of flash that needs trimming.  Most of it should be easily rubbed off with a blade with only a few miniatures needing a cut and file.  The heads look like they’ve got decent sized necks to join them to the bodies so a bit of superglue should be all that is needed to stick them on.  Pinning them would probably be overkill and very time consuming.  These are the first miniatures I’ve bought that have the rolled shoulder type bases and I have to say that I love them!

SoTRzombies04 SoTRzombies05

I tried them on the Black Tree stuff and they look incredible.  For a while I’ve had the feeling these miniatures were missing “something” but I just couldn’t put my finger on it.  So off I went to eM4’s website and placed an order for 100 of the 30mm and 10 each of the 40mm and 50mm rolled shoulder bases.  Best of all is that the washer bases I’ve used for the miniatures fit nicely into the recess on the bases so rebasing them should just be a case of a drop or two of glue.  The metal washer bases won’t have been wasted though as I plan to get some small (4-5mm) cube magnets and paint them to be used as status markers for the various rule sets.

Standardising the bases of all my WW2 minis (28mm at least) should allow me to use the zombies in games like Hell on Earth or All Things Zombie, and likewise I should be able to use the Germans/British/US in games like Secrets of the Third Reich.  What’s that you say?  I don’t own Secrets of the Third Reich?  Well no, not yet I don’t :)

Since the rest of the Incursion stuff is likely to be arriving any day now I really should get cracking and start painting these zombies.

Sunday, August 15, 2010

Dave Graffam Buildings – Wrecked House Part 1

While waiting for the glue to dry on the split ruin building I started working on the wrecked house.  This build was a lot faster than the previous one, so fast in fact that I found myself waiting for glue to dry on this building.

GraffamWreckedHouse01

While the column supports were optional in the previous build they’re really needed in this one.  Not so much for the strength in my case but to actually hold the floor in place while I drill and pin it to the walls.  The cardstock columns looked too fiddly to muck around with so I drug out the ever useful balsa wood.

GraffamWreckedHouse02

Two 6.5mm strips back to back, cut to length and then glue to the floor.  I gave the glue on the floor fifteen minutes and then glue on the upper floor.  I was happy enough with the results that I added two to the other building too.  An inkwash and a light drybrush should do the job when it’s all dried.

GraffamWreckedHouse03 GraffamWreckedHouse04

A couple shots to give you and idea of the size of the wrecked house.

GraffamWreckedHouse05 GraffamWreckedHouse06

While waiting for glue to dry elsewhere I added a few bits of rubble here and there.

GraffamWreckedHouse07 GraffamWreckedHouse08

After all the construction so far there’s about a third of the MDF sheet left, which may be enough for the tower and ruined cottage.

GraffamWreckedHouse09

But even working on three buildings per $5 sheet we’re only talking about $1.66 per building.  Not too shabby at all.

Dave Graffam Buildings – Split Ruin Part 2

Spent a little more time on the split ruin this morning and it just keeps looking better.  I eventually settled on using cardstock for the roof and it looks better than I thought.  It helped that on this model you fold the roof over so it is actually two sheets of cardstock thick.  I’ll have to do that with all the buildings I think.

Here’s a few shots of the building assembled and based.

GraffamSplitRuin13 GraffamSplitRuin14

GraffamSplitRuin15 GraffamSplitRuin16

GraffamSplitRuin17

I’ve added a little bit of sawdust, pebbles and wood chips to add a little 3D rubble.  The rubble on the artwork is great and won’t get in the way of the miniatures so I’ll leave that alone.

GraffamSplitRuin18

Working on the wrecked house now while waiting for the glue to set on this one to dry.  Tonight I’ll start painting the edges of the MDF and give the rubble a grey/black paint/wash and then tomorrow night I’ll look at flocking the rest of the base.  If I’m feeling adventurous enough and I’m not too tired from work I’m thinking of putting a little stone wall near the side door, we’ll see.

These Dave Graffam buildings really are the business.  They’re simple to build, look good and still allow you to get your hobby groove on what’s not to love?