

Showing posts with label 1/600. Show all posts
Showing posts with label 1/600. Show all posts
Friday, April 9, 2010
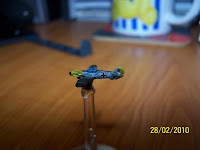
Bag the Hun - French BC Dunkerque
I made another boat... and by boat I mean battle cruiser and by made I mean I copied it from Wikipedia, cropped and scaled the image using The Gimp and Inkscape.
 Anyway I hereby present the French battle cruiser Dunkerque.
Monday, March 8, 2010
1/600 Scale Aircraft Props
I love my little planes, I really do but there was something about them that just didn't feel right. At first I thought it was because they were so small or maybe even because there wasn't that many miniatures on the table. But a week or so ago it came to me: no props. The aircraft look incomplete without them. So how do I make props that small?
Prototype
I found some scrap laminate I had left over from my card making projects and used a hole punch to make some small discs. Then using a hobby knife I cut a hole in the middle, this almost ended badly for my hand so please be careful if you are going to try this yourself.
It took a lot of work but I eventually ended up with an aircraft that looks like this:

Mass Production
 My wife has one of those Craft Robo hobby cutters which should do the trick nicely. The ideas is to use a laminate sheet which should be sturdy without being too thick for the Craft Robo to cut.
It's so obvious now but when putting a laminate pocket through your laminator with nothing in it you have to make sure it comes out the other side. I wasn't paying enough attention when I noticed half the pocket had gone in one side but nothing was coming out the other!
 Done properly you should get something like this:

It looks like it's working...

And it does!

I made two sizes, one based on the the Spitfire prop size and the other based on a He 111. I rounded the Spitfire one down to the nearest mm while I rounded the Heinkel one up. It turns out that the bigger ones are too big while the smaller are just right. I think the bigger ones will be fine for the really big boys like the B-17's and such so I'm not too worried.

Here are the files for anyone who wants to have a go this themselves. I've included a PDF version so you can cut some out on plain paper to see how the size fares with your models.
PDF version
GSD version
Storage
The only outstanding issue is now of storage. All of my aircraft are currently stored here:

Prototype
I found some scrap laminate I had left over from my card making projects and used a hole punch to make some small discs. Then using a hobby knife I cut a hole in the middle, this almost ended badly for my hand so please be careful if you are going to try this yourself.
It took a lot of work but I eventually ended up with an aircraft that looks like this:

Yeah I know, it looks freaking sweet! A little grey paint for some prop blur and it will look amazing. Great so now I just need to make around a hundred or so of these...
Mass Production

It's so obvious now but when putting a laminate pocket through your laminator with nothing in it you have to make sure it comes out the other side. I wasn't paying enough attention when I noticed half the pocket had gone in one side but nothing was coming out the other!


So I put the laminate onto the carrier sheet and loaded it into the Craft Robo, making sure to put in the right blade and the check all the settings... then I pressed the cut button.
It looks like it's working...

And it does!

I made two sizes, one based on the the Spitfire prop size and the other based on a He 111. I rounded the Spitfire one down to the nearest mm while I rounded the Heinkel one up. It turns out that the bigger ones are too big while the smaller are just right. I think the bigger ones will be fine for the really big boys like the B-17's and such so I'm not too worried.

I'm really happy with the results, they might need a bit of grey paint to show prop blur but even as is they look way better than they did. I've stuck them on using MDF glue which will dry semi transparent and help with the blurred look. All up this has taken maybe an hour from cutting the plastic to sticking them on the aircraft and it only cost me one laminate pocket which my rough calculations comes to the princely sum of 16 cents.
Here are the files for anyone who wants to have a go this themselves. I've included a PDF version so you can cut some out on plain paper to see how the size fares with your models.
PDF version
GSD version
Storage
The only outstanding issue is now of storage. All of my aircraft are currently stored here:

Most of the aircraft have enough clearance with the props on to be stored as-is but a few of them will need little risers. I think I'll make up some little MDF risers and put some a strip of magnetic sheet on top to hold the aircraft.
Conclusion
If you have aircraft without props and have access to a cutter of some sort then you need to do this. Your aircraft will look so much better for it.
Update:
Corrected aircraft names in the Mass Production section, thanks Doug. Not enough sleep and I think one thing and type another.
Sunday, March 7, 2010
1/1200 Scale Ships for Bag the Hun
I've been having fun with the expanded rules for ground/surface targets in Bag the Hun I decided to have a go at replacing my plain scraps of paper with some less plain scraps of paper. I haven't bought any minis yet as I'm a little torn between scales. I like the look of 1/1200 scale but they're too big (and expensive) for anything except Bag the Hun, naval games at this scale would require huge tables. 1/2400 minis are just right for the table and the wallet for naval gaming purposes but don't have that 'wow' factor of aircraft buzzing over large ships. So I think I'll start with paper 'top down' shots of some ships for the Hun and see how things go from there.
At 1/1200 they're about 6 hexes long on my map which looks right to my eyes. To reduce them to 1/2400 just print them at 50% magnification. All images are courtesy of Wikipedia.

Download a PDF version here.
Eventually I'd like to get some of these made up for the Battle of the Coral Sea scenarios I've been putting together but for now I'll toy around with these until I'm happy with the size/speed/mechanic etc.
Let me know if you find any of these useful or if you have any particular requests for ships.
Monday, March 1, 2010
Doms Decals, How I Put Them On
I thought I'd have a go at putting the tail markings on some of the 109's and take a few photos of the process while I was at it. I don't claim this to be the "right" way to apply decals, it's just the way that works for me.
 First up the tools required: a saucer of water, pretty obvious I know but the colour of the saucer is oh so important. You want something that helps the decal stand out. It's not an issue when you're applying a British roundel but you'll thank or curse your colour choice when you're putting on white Balkan crosses.
 I usually cut enough decals to do six aircraft. No particular reason it's just a number that works for me.
 Trim your decals down as much as you can. What I didn't do here was trim away much of the gap between the decals which made the application a little trickier than it should have been.
 Cut them out over the saucer and let them drop it. Leave them there to sit for maybe 30 seconds.
 Using the brush slide one of the decals over to the edge of the saucer.
 Carefully slide the decal off the paper. I slide the decal about 3/4 of the way off and then slide the brush under the decal and lift it up.
 Bad photo sorry but trust me there is a decal on the end of the brush. The idea is to put the brush where you want to aply the decal and let an edge of the decal touch the mini. What should happen is the decal will want to stick to the model and slide off the wet brush.
 This is where it got really tricky. If I had trimmed the decal down properly then I would have had heaps of room to position the decal but since I was trying to put a misshapen rectangle onto the tail I had to do quite a bit of shuffling and sliding to get it into a good spot.
On saving grace is at 1/600 scale it doesn't matter if a decal isn't exactly in the right spot. If it looks like it's in the right spot then it is in the right spot.
 The finished product. I don't know if the tail markings do much for the miniature when it's on the table but it does add to the oh wow factor when looked at up close.
So now onto my next fiddly project: propellers.


On saving grace is at 1/600 scale it doesn't matter if a decal isn't exactly in the right spot. If it looks like it's in the right spot then it is in the right spot.

So now onto my next fiddly project: propellers.
Wednesday, February 24, 2010
Dom's Decals: US, Japan and "Those" Tail Markings
The postman arrived this morning with my order of decals from Dom. The Japanes and US decals are pretty much what I expected but it's the Luftwaffe tail markings that I'm most impressed with, even the tiniest ones of maybe 1mm in size have clear definition. There are 7 different sizes in both solid and outlined types. The bigger two sizes are probably too big for any of my aircraft, understandanble since they are 1/300 decals. But the smaller 5 sizes will look right at home on the TD aircraft.
I'm thinking maybe I should have gotten some of the white ones as well but, if I'm really careful, I should be able to just paint a small square of white and then place the decal over that.

Now this does mean that I've got no excuses to not paint those squadrons of Zeroes and Wildcats. I'll get the tail markings on some of the German aircraft and try to get the Zeroes done with photos posted tonight.
Wednesday, January 27, 2010
Bag the Hun - More Decals
With the imminent release of Bag the Hun 2 I thought I should get some paint on the last couple bags of my Tumbling Dice aircraft, mainly the US and Japanese aircraft. I had them all out on the painting table when I realised I didn't have any decals to finish them off. That just wouldn't do, so I quickly jumped onto Dom's website and had a look for what decals I'd need.
Hmmm just what I thought, the US changed their roundels around a fair bit mid to late war and since I didn't want to paint up the same models for each period I settled on the "600-US-2" set (see below). They're only used between '42-'43 but I think they'll look better on the small TD aircraft than the other designs would.

For the Japanese aircraft I went with the "600-JA-1" set, nothing to fancy but saves me having to paint a heap of red circles. The white border should help the decal stand out too.

Lastly I thought I'd grab a set of Germain tail markings, set "300-GE-10a" to help finish off the bigger bombers. These are actually 1/300 scale decals but should fit the bombers just fine, with a little luck the smaller may even go onto the fighters.

I was very tempted to pick up some more aircraft, specifically the late war German jet fighters, but I'll wait until I've had a good read through of the BTH2 rulebook before I make any purchases. Besides the Bosche have little trouble knocking my Spits out of the sky as it is, do I really need to make it any easier for them? I guess I could get some Meteors to even things up a little. I have a birthday coming up soon, I think a celebratory purchase will be in order.
Hmmm just what I thought, the US changed their roundels around a fair bit mid to late war and since I didn't want to paint up the same models for each period I settled on the "600-US-2" set (see below). They're only used between '42-'43 but I think they'll look better on the small TD aircraft than the other designs would.
For the Japanese aircraft I went with the "600-JA-1" set, nothing to fancy but saves me having to paint a heap of red circles. The white border should help the decal stand out too.
Lastly I thought I'd grab a set of Germain tail markings, set "300-GE-10a" to help finish off the bigger bombers. These are actually 1/300 scale decals but should fit the bombers just fine, with a little luck the smaller may even go onto the fighters.
I was very tempted to pick up some more aircraft, specifically the late war German jet fighters, but I'll wait until I've had a good read through of the BTH2 rulebook before I make any purchases. Besides the Bosche have little trouble knocking my Spits out of the sky as it is, do I really need to make it any easier for them? I guess I could get some Meteors to even things up a little. I have a birthday coming up soon, I think a celebratory purchase will be in order.
Saturday, January 23, 2010
Bag the Hun Hex Mat Under the Microscope
A little while ago now I put together a nice hex mat for use with Bag the Hun, you can see the end result here, here and here. There were a few bumps along the way which you can look at and grimace here and here.
So with all the lessons learned and as much information gathered as I could, how did I actually make it?
Step 1: Aerial photography
At work I have access to our GIS system which has aerial photography of our city and the local surrounds. I spent quite a while trying to find an area that when zoomed out looked something like Europe during WW2. Basically rolling hills, farms and small clusters of towns, nothing too modern. I got the system to export the map as a whopping huge JPG. At 200dpi the file is around 30mb and is 8,401x11,893 pixels in size. Which when printed should come out to at least 106.7cm x 151cm (42"x59.5"), I'll explain more about that in step 3.
Step 2: Hexes
I needed lots and lots of them, so how to put them in the image at the right size. I had decided on 1.5" hexes as I wanted as many hexes as I could get on the mat. I like playing big battles, 3 to 4 squadrons at a time big. Bombers fit nicely on the 1.5" hexes although I haven't got any of the big boys, you know the FW200, B17's and so on.
Initially I used The Gimp to put the hexes in with a plugin in aptly named "Hex Grid". There's probably other plugins that do it as well but this one was pretty easy. I tested it on an A4 image first and went through a few iterations of filter/print/measure/repeat.
In the end though we used AutoCAD to render the hexes and then imported them and the aerial photo into our mapping software. At that point we added a spiffy border and decided on a page size.
Step 3: Paper Size
We initially were going to print the mat on B0 sized paper but decided to go with "ISO B0 Oversized" or something or rather. Bigger the better I thought, this ended up bighting me in the arse later though. Before getting to far into steps 1 and 2, and assuming for the moment that money is no object here, I should have asked two vitally important questions:
None of the copier places around town could laminate anything over 1m wide and/or 1.4m long. I was sunk in both areas. After a day of calling around I eventually found a print house that could do what they call cold press laminating. Laminating usually is the process of putting your work into a plastic pocket/sock and heating it up so that it seals both sides. Cold press laminating uses rollers and great pressure to press plastic onto one side of your mat. The plastic they used on mine was a matt plastic and didn't have the high gloss shine you usually get with laminating. This looks fan-freaking-tastic on the table.
Step 5: Using It
The guy that did the laminating for me told me that I could roll this thing up and that it would roll out flat again even after being in storage for a while. This is not the case. However I do find that all it takes is a bit of BluTac and some stick tape and the mat stays nice and flat on the table.
Costs
Ahh the biggest question of all, how much did it cost me? The printing cost me very little, but after asking around at work it would usually cost around the $20-$30AUS to print. The cost will vary though depending on the resolution and quality it's printed at. I went for 200dpi and normal quality, it doesn't need to be high-res or have lots of detail as that would just detract from your miniatures. The laminating cost me $25AUS.
So would I do it again? I don't know. I do need some naval mats for the Pacific theater but I'm thinking I'll just go with a couple double sided Hotz Mats. The felt makes them so much easier to store and just roll out on the table. I love my western town mat I got from them and their prices aren't that much more than what it would cost me to make my own.
So that's how I made my BTH mat. I'm sure I've missed something out or maybe just glossed over something to quickly, if so just leave a comment here and I'll do my best to clarify/expand.
Also if anyone wants a copy of the artwork or the completed mat files just drop an email to tcoombes @ bigpond dot net dot au.
Thanks for reading,
Timbo
So with all the lessons learned and as much information gathered as I could, how did I actually make it?
Step 1: Aerial photography
At work I have access to our GIS system which has aerial photography of our city and the local surrounds. I spent quite a while trying to find an area that when zoomed out looked something like Europe during WW2. Basically rolling hills, farms and small clusters of towns, nothing too modern. I got the system to export the map as a whopping huge JPG. At 200dpi the file is around 30mb and is 8,401x11,893 pixels in size. Which when printed should come out to at least 106.7cm x 151cm (42"x59.5"), I'll explain more about that in step 3.
Step 2: Hexes
I needed lots and lots of them, so how to put them in the image at the right size. I had decided on 1.5" hexes as I wanted as many hexes as I could get on the mat. I like playing big battles, 3 to 4 squadrons at a time big. Bombers fit nicely on the 1.5" hexes although I haven't got any of the big boys, you know the FW200, B17's and so on.
Initially I used The Gimp to put the hexes in with a plugin in aptly named "Hex Grid". There's probably other plugins that do it as well but this one was pretty easy. I tested it on an A4 image first and went through a few iterations of filter/print/measure/repeat.
In the end though we used AutoCAD to render the hexes and then imported them and the aerial photo into our mapping software. At that point we added a spiffy border and decided on a page size.
Step 3: Paper Size
We initially were going to print the mat on B0 sized paper but decided to go with "ISO B0 Oversized" or something or rather. Bigger the better I thought, this ended up bighting me in the arse later though. Before getting to far into steps 1 and 2, and assuming for the moment that money is no object here, I should have asked two vitally important questions:
- How big can I print this?
- And oh so more impartantly "at that size can I get it laminated?"
None of the copier places around town could laminate anything over 1m wide and/or 1.4m long. I was sunk in both areas. After a day of calling around I eventually found a print house that could do what they call cold press laminating. Laminating usually is the process of putting your work into a plastic pocket/sock and heating it up so that it seals both sides. Cold press laminating uses rollers and great pressure to press plastic onto one side of your mat. The plastic they used on mine was a matt plastic and didn't have the high gloss shine you usually get with laminating. This looks fan-freaking-tastic on the table.
Step 5: Using It
The guy that did the laminating for me told me that I could roll this thing up and that it would roll out flat again even after being in storage for a while. This is not the case. However I do find that all it takes is a bit of BluTac and some stick tape and the mat stays nice and flat on the table.
Costs
Ahh the biggest question of all, how much did it cost me? The printing cost me very little, but after asking around at work it would usually cost around the $20-$30AUS to print. The cost will vary though depending on the resolution and quality it's printed at. I went for 200dpi and normal quality, it doesn't need to be high-res or have lots of detail as that would just detract from your miniatures. The laminating cost me $25AUS.
So would I do it again? I don't know. I do need some naval mats for the Pacific theater but I'm thinking I'll just go with a couple double sided Hotz Mats. The felt makes them so much easier to store and just roll out on the table. I love my western town mat I got from them and their prices aren't that much more than what it would cost me to make my own.
So that's how I made my BTH mat. I'm sure I've missed something out or maybe just glossed over something to quickly, if so just leave a comment here and I'll do my best to clarify/expand.
Also if anyone wants a copy of the artwork or the completed mat files just drop an email to tcoombes @ bigpond dot net dot au.
Thanks for reading,
Timbo
Saturday, January 2, 2010
My Next Project... WW2 Africa in 1/600
Before start I want to you to go here and read. I'm not quite sure how to put into words how excited I am about this so I'll summarise in point form:
Anyway I should get back to construction zone in the backyard. Tonight I'll try to get some photos up of the ever so slowly progressing Wargods stuff.
- Tanks, lot's of them!
- At this scale terrain is really simple, pipe cleaners actually are tree sized and cotton wool does look like bocage.
- Only $35US +PP for an army, with options.
- More tanks.
- Very easy to paint.
- I already have a mountain of 1/600 decals.
- I'll finally get to play Blitzkreig Commander... with lots and lots of tanks!
Anyway I should get back to construction zone in the backyard. Tonight I'll try to get some photos up of the ever so slowly progressing Wargods stuff.
Sunday, September 13, 2009
Workbench: 1/600 Aircraft
On the Workbench
11 x BF109E's - based
4 x Gloster Gladiators - based, painting started
3 x Ju88 - based, painted
6 x DO17E's - undercoated
6 x Hurricanes - based
6 x Hurricanes - based, painted
4 x Blenheim Mk 1 - based, undercoated
12 x FW190A-3 - based
Completed
12 x BF110's
13 x BF109E's
6 x He111's
4 x JU87's
6 x Boulton Paul Defiants
12 x Spitfire Mk 1
53 Total
View all Entries
Sunday, September 6, 2009
Bag the Hun - AAR
Another great game of Bag The Hun last night. Reichsmarschall Toby and I played another 'Get the bomber home' scenario and both of us were fielding some freshly painted (but not quite finished) models.
Luftwaffe
1 Heinkel He 111
4 Messerschmitt Bf 110
4 Messerschmitt Bf 109
RAF
6 Supermarine Spitfire MK1 (in two sections)
3 Hawker Hurricane MIIc
The game started with the hun heading north to south (left to right in the photo below) with RAF starting in the south west and heading for intercept.


Luftwaffe
1 Heinkel He 111
4 Messerschmitt Bf 110
4 Messerschmitt Bf 109
RAF
6 Supermarine Spitfire MK1 (in two sections)
3 Hawker Hurricane MIIc
The game started with the hun heading north to south (left to right in the photo below) with RAF starting in the south west and heading for intercept.

A nice table level shot shows a section of the Spitfires and the Hurricanes heading straight for the bombers and fighter bombers while green section hangs back to see where the 109s were heading.

A shot from the Hun end of the table. Things look a lot cleaner on the table with the altitude dice attached to the bases.

The Spitfires valiantly try to hold off the Messerschmitts. Fire is exchanged and losses are taken on both sides. A Spitfire explodes and another is damaged, a 110 also gets hit hard. A great opportunity to bring out the pipe cleaner smoke trails.

But with the end of the deck means a new turn. And with a new turn comes a reshuffled deck and so with a little bit of luck and a strong tailwind...
Success!! A hard turn, altitude drop and the choice of throttle dice put Section Leader Potta right behind the heinkell. Things start to look up as Potta passes his Getting on the Tail test. Things start to look a little gloomy as a 109 (just to the left of this photo) moves up behind Potta and attempts also to get on the tail, thankfully he fails. Hun aircraft start to move in from everywhere in an attampt to remove the Hurricane from it's lofty perch of destruction.
Well Potta had worked his magic and soon enough a card he's been waiting on turns over 'Character 1'. Potta opens fire with both cannons and uses every last round left. Base attack of 10, Junior Ace is +1 (11), 8 sections of fire is +5 (16), Target is Size 5 so +4 (20) and he's Dead Close so +2 again for a total of 22 dice. The result is good 6 successes. The Heinkell save 1 to reduce the hits to 5 which is still enough for a Critical roll. The roll is a 7 'Critical Instrument Damage' which is not exactly the result I wanted... but then Toby reminds me that no it's actually a 10, the Fuel Leak from the previous turn adds +3 to the next damage result. 10... so in the immortal words of Marvin the Martian: kaboom an Earth shattering kaboom.
A great game and a solid victory to the British. I simply cannot wait to get my hands on Bag the Hun 2 and the rules for ground attacks. I'm really looking forward to some big bombing run games... and will give me chance to use the dozen or so Do17 miniatures. Oh and of course I'd had to get some Mark Vc Spitfires in the air, fire factor 12 anyone?
Saturday, September 5, 2009
Bag the Hun - Better Bases
My order of tokens and dice from Em4 arrived not so long ago and with Badga on tonight I thought I should actually get everything ready.
The 7mm dice are just the right size to blue-tac onto the base. This solves the problem of dice getting left behind after a plane has moved and the confusion of conjestion "is this dice for your plane or my plane?". Also there's no chance of altitude dice getting confused with fire dice (especially around planes at altitude 5-6).


Anyway gotta grab a coffee and get back to painting the 110's for tonight.
The 7mm dice are just the right size to blue-tac onto the base. This solves the problem of dice getting left behind after a plane has moved and the confusion of conjestion "is this dice for your plane or my plane?". Also there's no chance of altitude dice getting confused with fire dice (especially around planes at altitude 5-6).


Here's everything stored in a small case, I'd like to try and find a bigger one though as I'd like to store all the dice and tokens for all my games in the one place.

Anyway gotta grab a coffee and get back to painting the 110's for tonight.
Sunday, August 23, 2009
Bag the Hun
I didn't manage to get the western stuff ready in time for Badga so I took along the trust Bag the Hun and set that up. Mick played the Germans who had to escort a Dornier off the table. Once again I strapped myself into the cockpit of a Spitfire and tried to bring the big guy down.
I forgot I had the camera with me so the first shot is sometime in the third turn. The three Spitfires had the Dornier surrounded and hit it with everything they had. Gunner killed and temporary loss of control followed by another hit that stopped the bomber from climbing and performing hard maneuvers. The next two cards though were the Bomber Move and the bomber Pilot character card. The darned thing made it's roll to regain control and quickly (for a Dornier) ducked out of there. Soooo close.

Another shot of the Dornier trying to make a quick getaway. The pilot character card really helped the Germans in this scenario. What should have been a 6-7 run across the table ended up being 5 turns, not a lot of time to take it down.


Result: A win for Mick and the Hun. The British managed to cause some serious damage to the bomber and rattle a few of the BF109's but at the cost of two downed Spitfires was too high a price for so little a return.
I forgot I had the camera with me so the first shot is sometime in the third turn. The three Spitfires had the Dornier surrounded and hit it with everything they had. Gunner killed and temporary loss of control followed by another hit that stopped the bomber from climbing and performing hard maneuvers. The next two cards though were the Bomber Move and the bomber Pilot character card. The darned thing made it's roll to regain control and quickly (for a Dornier) ducked out of there. Soooo close.

Another shot of the Dornier trying to make a quick getaway. The pilot character card really helped the Germans in this scenario. What should have been a 6-7 run across the table ended up being 5 turns, not a lot of time to take it down.

One lone Junior Ace desperay left trying to catch the bomber when three BF109's swooped in to make things even harder.

Result: A win for Mick and the Hun. The British managed to cause some serious damage to the bomber and rattle a few of the BF109's but at the cost of two downed Spitfires was too high a price for so little a return.
The coloured tokens in the bases really helped move things along. The smaller dice for altitude should also tidy up the table, possibly even being able to blu-tac them to the base also.
I think next meet we'll try a game with 3-4 players and give every one a section or two each. Hmmm I'd better paint the rest of the 109's and the Hurricane's then.
Thursday, August 13, 2009
A New Hex Mat
Managed to finally get my new hex mat for Bag the Hun laminated today. It took a bit to find someone who could laminate oversized B0. The laminate is matt finished and looks fantastic on the table. The finish eliminates the shiny reflective surface of most other laminates and also mutes the map image somewhat which helps the miniatures stay the focus of the game.
So to celebrate the new mat Toby and I decided to drag out the miniatures and have a game. Three squadrons of Spitfires vs two schwarms of 'Schmitts escorting two DO-17's. The British needed to down one of the bombers to get a minor victory and both for a outright victory.
 The planes starting to group up forced a lot of altitude changes and desperate manoeuvering in order to shake planes of their tail. A lot of the sprogs did rather well this game with only a few failing their manoeuvre rolls.
You can see in the shot below that even up close the mat doesn't get lost in the flash.


The bombers absorbed a lot of gunfire with a lot of minor damage results, eventually though after one of the Dornier's lost a gunner and an injured pilot they decided to bail out. With time running out and the edge of the map getting closer every turn it proved impossible to take out the second bomber when it dived below the fighters altitude. The most intense dogfighting took place in the 5-6 band range with the bombers hovering around 3-4 and eventually snuck down to 2.
In the end the British scored a minor victory taking down one of the bombers. The Germans achieved a tactical victory by accounting for three of the spitfires with another 3-4 in imminent trouble.
I really need to get some different coloured dice to minimise the chance of getting mixed up with the attack dice. All up the game was over in under an hour which is pretty good considering we were pushing around 22 planes. Next time I'd like to try a 3 player game with 30-40 planes and have some bombing runs to give the big guys something to do other than head for the other edge of the mat.
Sunday, June 7, 2009
BF109's, BF110's, Do17E's and Gloster Gladiators
I was able to get a bit more of the Tumbling Dice minis prepped and based today while watching the football (Australian Rules football that is). The results of which just proves that you can outscore your opponent and lead the game for three quarters of the match but still lose the game in the fourth... oh Essendon why do you forsake me so...
Planes? oh yeah the planes... I managed to get done:
11 x BF 109's (the rest of the second squadron)
12 x BF110's (a squadron? Were bombers organised in this way? I must look that one up)
6 x Do17E's
4 x Gloster Gladiators (still need to do the second wing and the under carriage on those ones).

There's not a great deal left from the order, at this rate I'll have to place another order soon, *looks over his shoulder to make sure his wife isn't in the room* maybe some British Bombers oh and an FW200 Condor or three... then I can start on the Pacific theatre and then back to the Western Front... *looks over his should again*
 All That's Left
6 x Do17Z's
6 x Do17P's 4 x Ju87's
4 x Ju88's
12 x Wildcats
12 x A6M Zero's
6 x Do17P's 4 x Ju87's
4 x Ju88's
12 x Wildcats
12 x A6M Zero's
Saturday, June 6, 2009
When The Going Gets Tough...
I must have worked on the hexes for maybe 2 hours before I realised that the hexes weren't lining up properly on the left side of the map. I didn't panic I just realised that being half an inch out after seven rows of hexes was going to be a problem. So I got out the kitchen clean and scrubbed all my hard work off the laminate.
I decided on a different approach this time and marked out each horizontal row and used a stright edge to mark the points on the pre marked lines. I worked through the night and eventually called it quits around 4am.

I woke up all enthused to finish off the mat when it dawned on me that I was only close to finishing the first half. My heart sank even more when I noticed that some of the hexes looked visibly squished and even more so at the fact that the hex grid was too dominant and made the photo difficult to see clearly.

At this point I did the only thing that any reasonable person would do... I gave up. Well sort of, I decided to get the hexes off the mat and get another one made up with hexes already on it.

The really nice thing about this mat is that the grid lines are transparent and don't dominate the photography. If you look at the photo below you can see the grid quite clearly in the foreground but they seem to dissapear into the background quite quickly.

Here's a few closeup shots of the grid.

It's really nice that the grid lines don't obscure the detail below. Just have to get it laminated and I'll be all ready to go.

I'll still use the other mat for games like Action Stations and Scramble!, but for Bag the Hun it's hexes all the way.
Subscribe to:
Posts (Atom)